Tuesday, October 29, 2013

Twelve Angry Jurors

This is the final season of Mount Royal University's Theatre Program productions. MRU has cancelled our theatre performance, theatre production and music performance diplomas because of massive budget cutbacks by the Alberta Provincial Government.

Our second year students need to graduate and we are here for one more year and one last season of Theatre MRU. The 2013/14 Season consists of "Twelve Angry Jurors" (November 21-30), "The Winter's Tale" (February 6-15 - copro with The Shakespeare Company) and "Dracula" (March 27- April 5).

I am designing the scenery and the lighting for our production of "Twelve Angry Jurors". The play was originally a teleplay for live television in the 1950's called "Twelve Angry Men". It was then made into a movie staring Henry Fonda, Lee J. Cobb, and E.G. Marshall. Subsequently, it was adapted for the stage by Reginald Rose. The play received a revival in the '90's on Broadway and the script has been adapted to allow for mixed cast (Twelve Angry Jurors) or an all female cast (Twelve Angry Women).

Twelve Angry Men 1957
The play will be presented in the MRU Nickle Theatre. I approached the set design with a view to bringing the message of the play home to the Mount Royal University situation. I wanted to reflect the image of the university within the play to illustrate the play's theme of finding truth and justice amidst prejudice, ignorance and apathy and how relevant that is to our present situation. Therefore, I mirrored the architecture of the university's West Gate facade into the design of the jury room. I found it extremely ironic that the icons of ARTS, MUSIC, JUSTICE and NURSING are etched into the MRU West Gate glass windows and yet the university has decided, in its wisdom, to completely remove two of those four pillars of education from its curriculum.
MRU West Gate Entrance
Perspective Colour Sketch of Twelve Angry Jurors Set Design

View From Inside the West Gate
The jury room table is a replica of many of the board room tables found in MRU Faculty meeting rooms. The wood trim is a replica of the trim features of the interior spaces of the university and the walls are painted with a colour and texture similar to the stone of the West Gate facade.

Construction began on the scenery last week. I will be documenting the progress of the production here.
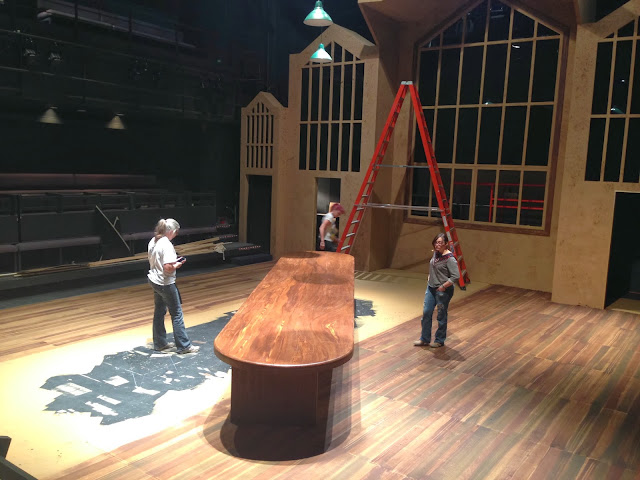
Technical Director Lorelee Godden lays out the main two door units

Robyn Ayles adds textured paint
Units Standing - Roof Next
Roof is up! Focusing lights today (Sunday before Remembrance Day... very very quiet here).
Roof and Jury Table Added
Let there be light!

Let there be paint!


Let there be light, paint and props!


Add Actors!

Add Costumes!

Thursday, April 26, 2012

Shady Business - Set and Lighting Design

Shady Business by Robin Hawdon
Stage West
August 26 - October 30, 2011
Directed by: J. Sean Elliott
Set and Lighting Design by: Douglas J. Rathbun
Costume Design by: Rebecca Toon

Naomi Costain and Scott Valentine in Stage West's "Shady Business"

CityTV Breakfast TV Interview with Scott Valentine

(see video from the production at 3:00)

Stage West Promotional Video of Shady Business


Article on the production in FFWD


Shady Business is a farce that centres on Mandy and Tania, two dancers working at a club owned by Mandy's boyfriend, Big Mack, who is one of the biggest crime bosses in the area. Originally set in London, England, for this production, the Director, J. Sean Eliot change the location to New Jersey, NY. In the play, Mandy has fallen in love with another man, Gerry, a city broker she met at the club. Complications ensue when Terry, a new henchman, arrives with the weekly take from one of Mack's businesses. The money is short and the boss is on his way to collect. Now Mandy and Tania don't just have to hide Gerry, but also have to hide the missing grand and keep Mack and his musclemen - Dozer and Harry the Hammer - from finding out the truth.


The Scene

The scene is Big Mack's New Jersey condominium apartment where he "keeps" Mandy. Big Mack may own the apartment but it is clear that Mandy lives there. There is a main entrance stage left, a livingroom, a raised platform bed area, a bathroom door upstage centre, a wet bar, french doors to a balcony, and a swinging door to the kitchen.

The Concept

Dress Rehearsal - Set Not Dressed (no artwork)
In discussion with the Director, I designed the bathroom door to be upstage centre. There is a major "reveal" in the middle of Act II where Terry, trapped in the bathroom with Big Mac in the living room, dresses as a woman using Mandy's clothes from the bathroom to disguise his identity from Big Mac. This is a major moment of comedy in the play as Big Mac is expecting to find the man Mandy is supposed to be hiding in the bathroom. When Terry comes out in full drag, it is a show stopping moment. So the upstage centre entrance was key to planning the rest of the scenery. All the other spaces needed to work around the upstage centre bathroom door.

In concept, the design of the New Jersey apartment is one of money and class. It does, after all, belong to Big Mac. We saw Big Mac as a "classy" mobster, fond of fine clothes, expensive jewellery and fine wines. It is clear in the script he prefers the finer things in life. So the choices for the interior design of the apartment keyed on up scale fashionable contemporary design. 

This concept is counterpointed by Mandy's personality. Big Mac may own the apartment but Mandy lives there. I designed the bed, kitchen and bathroom appointments with Mandy's personality in mind. I reasoned that she would feel free to "make over" the more severe masculine look of the apartment in her bed, bathroom and the kitchen. She's a free spirit and very "girly-girl", so I made the bedspread and sheets "Hello Kitty" in pattern and very very pink. 

The bathroom is also very pink and festooned with hats, scarves, boas and other accoutrements of her "stripper" profession. It also shows she is a bit of a slob and gives Terry lots of material to work with for his "drag queen" performance. I had the kitchen area painted bright yellow with white daisies, again in keeping with the feminine "girly-girl" attitude to contrast the rest of the apartment.

The main part of the apartment is painted in bands of grey scale separated by chrome strips. The trim and doors are white and the furniture black/glass/chrome and taupe. The crown moulding is black and forms into two over head coves with inset quartz spotlights. 

The artwork is  very contemporary with three actual abstract paintings of New York by a New York artist around the bar. My choice of the Matisse nude over the bed was threefold. First, it represents sensuality/sexuality, and this is a sex-farce after all. Second, as it is a Matisse, it shows excellent taste. Third, being slightly abstract (Fauvism), it would not disturb the sensibilities of the mostly senior aged audience.

The Design

Napkin Concept Sketch Plan
I was in luck that J. Sean Elliott is very up to date as far as computer technology is concerned. As Sean was directing a play in Ontario during the design phase of this project, being connected through the technology of DropBox, my iPad, Sketchup Pro and the internet made the design concept development phase work extremely well.
Napkin Concept Sketch


1st Concept Perspective
I used a handwriting note program called Penultimate to sketch out some "napkin drawings" to illustrate different concepts for Sean. I created PDFs of the sketches and uploaded them to Dropbox where Sean would open them and we would discuss changes on the phone or by email exchange.

Sketchup

After settling on the arrangement of the apartment ( Kitchen downstage right, Bed centre stage right, bathroom upstage centre, bar upstage centre left, french doors to the balcony stage left and the main apartment entrance downstage left), I modeled the scenery in Google Sketchup Pro.

Preliminary Design Concept - No Textures
Final Design Concept Perspective Drawing with Shadows
I created the scenery to scale in Sketchup Pro based on a scale drawing the the Stage West stage and proscenium. I modeled the scenery with no textures or colours first and shared a number of versions with Sean. Once we had an agreement on the actual stage space (actor movement in and around the scenery was critical to the comic action), I designed the colour and texture treatment of the model in Sketchup Pro, designing and drawing the details of the bed, the wall colours, the bar, sliding pocket door of the bathroom, the bathroom and kitchen wallpaper, the exterior balcony and sky backing and the main entrance backing.

CLICK HERE FOR A REAL-TIME 3D MODEL OF THE DESIGN!

(you will be asked to install a viewer)

Working Drawings

Final Floor Plan
Skylite Working Drawing
I created a number of perspective and plan views of the model using the Sketchup Pro add-in program called "Layout". These views of the design were done in PDF and printed in colour plates for the entire production team to peruse. Once these final designs were approved by the team, I created more "Layout" drawings in the form of orthographic and isometric working drawings, floor plans, sections and elevations with dimension that were submitted to the Technical Director as construction drawings. 

The Model

1/4" Scale Model
Once the drawings were in the hands of the shop and the Technical Director, I set to work building a 1/4"=1'0" scale model of the set. The model was painted and mockup furniture items created to aid the director, stage manager and the cast visualize the scenery during rehearsals. 

The Lighting Design

Hanging Lights and Installing Scenery
During rehearsals, I set to work on the lighting design. The lighting for this play was relatively simple with only one fixed location to deal with. The play takes place in two separate times of day, morning and evening. I used a program called "WYSIWYG" to build a three dimensional virtual model of the design and realize the lighting on the computer. Building the design with this program allows me to see the effect of each light in the design in three dimensions with colour, texture, intensity and even shutter cuts. Once I finalize the location of all the lighting fixtures, their colours and textures, I print out a scale ceiling plan lighting plot and the attached schedules of equipment. Those documents go to the Master Electrician and he leads the crew in hanging, cabling and focusing the fixtures. 
Lighting Plot

After the Sunday night performance of the previous play finished, the lighting crew worked through Sunday night and into Monday during the day to get the design fitted up while the carpenters under the direction of the Technical Director put the scenery together. By Monday night, I directed the focus of the lighting fixtures while the crew put the finishing touches on the set. During the day on Tuesday, I sat with the Stage Manager and the Director and created the lighting levels and cues for the play. 

Over the next couple of days of technical and dress rehearsals, I made adjustments to lighting levels while supervising the decoration and finishing of the set dressing. The play opened to an audience on the Thursday night.
Opening Night Intermission

The play was well received and had some good media attention with Scott Valentine (of "Family Ties" fame) in the lead role as "Big Mac".

Thursday, April 28, 2011

A Midsummer Night's Dream

Directed by Ian Prinsloo
Set Design: Terry Gunvordahl
Lighting Design: Douglas J. Rathbun

This production was produced by Theatre MRU in the Nickle Theatre March 2011.


Wednesday, April 27, 2011

Move Over Mrs. Markham


Stage West, Calgary
Director: Bernard Cuffling
Set and Lighting Design by Douglas J. Rathbun

This British sex farce was written in the 1970's. The play is set in a very elegant top floor London flat, belonging to Philip and Joanna Markham. Philip is a straight-laced publisher of children's books, and he shares an office with his partner, Henry Lodge, on the ground floor. Philip had reluctantly agreed to let Henry borrow his apartment for the evening to 'entertain' his latest girlfriend. At the same time Joanna Markham had been persuaded by Linda Lodge to let her borrow the apartment so she can entertain her lover. What nobody knows is that the Interior Designer who had been decorating the apartment for the past three months had decided that this was the night he and the au pair girl would try out the new round bed! Not surprisingly, chaos and confusion ensue!

The director decided to set the play in modern day by removing many of the very dated references. The action takes place in the Markham's top floor London flat which is currently being redecorated by Alistair, the interior decorator, much to the chagrin of Phillip Markham. Two rooms must be visible to the audience, the livingroom and the bedroom. Entrances to the livingroom are from the study, the aux pair's bedroom and the main entrance hall. There is a walk in bar off the livingroom and the entrance to the bedroom. There is a bathroom off the bedroom. Much of the main action and comic business centres on the entrance to the bedroom and the walk-in bar area.

Scenery Design
Floor Plan Sketch
My concept for the design of the scenery centred around the fact that, although Philip hates the redesign of his flat, the designer, Alistair, is a very chic, upscale and competent designer. The characters comment on the design of the livingroom and bedroom which have already been completed. Alistar has started working on Philip's study. Philip comments that the livingroom looks like the bridge of the Starship Enterprise and the bedroom looks like a "pink nightmare". I decided to make the livingroom as modern, elegant and chic as possible to the point that it makes Philip uncomfortable to live in. I decided the bedroom would be so pink and feminine that Philip would definitely NOT feel he has any place in it. The only sanctuary in this flat for Philip would be his study. I designed the hallway to his study to indicate it is the only place he has to himself.

Perspective Sketch
The bedroom was on a raised platform where the "fourth wall" was "removed" so we could see the action inside. I left a small wall section in front of the raised platform and created a curved header that framed and suggested the invisible wall.
After a number of thumbnail sketch discussions with the director, I created a sketch floorplan and a perspective pencil sketch. I showed the director some samples of interior design colours and the types of furnishings I was considering.

Then I created a 3D model of the scenery using Google Sketchup 8. The model can be rotated, zoomed, panned and tilted and video fly-throughs are possible to give the best indication of how the space will work once built and setup.
Sketchup 3D Model of Scenery Design
 Once approved, I created the scale blueprint plans to give to the Technical Director and the scenic carpenters to guide them through the process of constructing the scenery.
Front Elevation Construction Drawing
Props and Paint Design
As the scenery designer, I am responsible for directing the painting of the scenery as well as the dressing of the set with furniture and set dressings. I coordinated with the paint/props technician at Stage West for the purchase and acquisition of all the furniture and set dressings required.
I created paint renderings and submitted paint swatched to indicate the paint treatment and colours required for the various set walls. I wanted the livingroom to have a high contrast granite wall treatment. It was based in a middle dove grey and then spattered with white and black paint. 
Black Granite Swatch
  I wanted the bedroom walls to be painted with a flat pink paint and then rag-rolled with semi-gloss latex glaze to give it a flocked wallpaper effect. There was also a floral pattern pink border across the top.
Bedroom Border Swatch
I sent the props technician out to find furniture within a range of styles. He would travel around town and send me photos from his phone of various pieces for my approval.
One of the livingroom chairs

Building the Model
After the approval of the design based on the renderings and the submission of the working drawings, I set about creating a scale model of the set design which would be used by the director, stage manager and actors in rehearsal and the scenic artists for reference.
Scale Model of the Scenery

Creating the Wall Art
I had in my mind a bold abstract artwork for the main wall in the livingroom that would compliment the ultra-chic interior design but also be bold enough that it would certainly have caused Philip headaches. I was not able to find anything that was large enough to suit, so I decided to paint it myself. I mapped out my idea for the design in scale. The painting would be created by fastening four 2'x2' square 1" thick framed painting canvasses together, painting the design on the canvas and then pulling the frames apart and positioning them on the wall two or three inches from each other. The upper left corner would be mostly red and the bottom right corner totally black.
Paint frames screwed together. Scale design on top of frame.
Painting in progress...
Painting complete still screwed together and resting on its side.

Lighting Design
The lighting design began with discussion with the director and viewing a few blocking run rehearsals. The action of the play in continuous, beginning late afternoon and continuing into the evening all on a summer day in London, England. The main motivational source of daylight is the large bedroom window upstage left with an exterior sky view. I decided I would add some wall sconce lighting fixtures to the bedroom that can add motivational sources for the evening scenes.

The Stage West theatre is a major challenge for stage lighting. With a ceiling grid only 13' off the stage floor, the lighting angles to the stage are less than ideal and make even illumination a major challenge. The Technical Director had recently purchased a number of new ETC Source4 Jr 30-50 Zooms which made area front lighting much easier.

After making a list of lighting requirements and purposes, I took the 3D drawings from Sketchup and imported them into my 3D lighting design program WYSIWYG. Once I had completed and converted the 3D scenery (there is always some redrawing necessary in conversion) I created lighting areas and placed lighting fixtures.
WYSIWYG 3D Lighting Software
WYSIWYG 3D View

The process of adding fixtures, colour, pattern, focusing (within the software) and patching the design takes a number of days. Once I am happy with the plan, within WYSIWYG, I create the scale lighting plot graphic and the data schedules and print them out.
PDF Printout of the scale Lighting Plot

Setup and Tech

The evening of  Sunday January 30th the previous production at Stage West had its final performance. Once that show came down, the crew began to dismantle the scenery and lighting. I was on hand to deliver my lighting design graphics and data schedules to the head electrician. Over night, the crew took the old show's lighting and scenery out and installed my set design. I arrived the next morning at 9am to inspect the scenery installation and supervise the lighting installation. By the afternoon, the lighting equipment was installed and configured ready to focus. The rest of the afternoon and evening were taken up with directing the focus and colouring of each individual lighting fixture.
Set and Lights Going Up

The next morning (Tuesday) while finishing touches were being applied to the scenery, I sat with the Stage Manager and Director and set the lighting cues and levels for the show. The actors arrive after lunch and work through a cue to cue rehearsal. The rest of Tuesday and Wednesday are taken up with technical rehearsals and finishing set dressing and painting in the breaks. The production opened to an audience on Thursday night and ran until April.
Technical Rehearsal

Dress Rehearsal